 少有人走的路
需求:
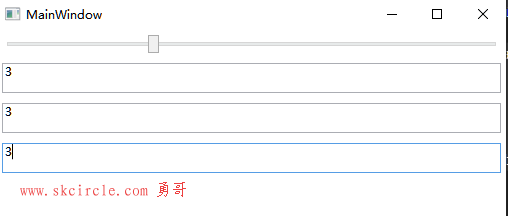
滑动条拖动,文本框值变化
文本框值变,滑动条值也变化
实际上是一种控件双方绑定的需求。
靠事件的实现:
   /// <summary>
    /// MainWindow.xaml 的交互逻辑
    /// </summary>
    public partial class MainWindow : Window
    {
        public MainWindow()
        {
            InitializeComponent();
        }

        private void Slider_ValueChanged(object sender, RoutedPropertyChangedEventArgs<double> e)
        {
            txt1.Text = slider.Value.ToString();
            txt2.Text = slider.Value.ToString();
            txt3.Text = slider.Value.ToString();
        }

        private void txt1_TextChanged(object sender, TextChangedEventArgs e)
        {
            slider.Value = double.Parse(txt1.Text);
        }
    }
<Grid> <StackPanel> <Slider x:Name="slider" Margin="5" ValueChanged="Slider_ValueChanged"/> <TextBox x:Name="txt1" Margin="5" Height="30" TextChanged="txt1_TextChanged"/> <TextBox x:Name="txt2" Margin="5" Height="30"/> <TextBox x:Name="txt3" Margin="5" Height="30"/> </StackPanel> </Grid>
靠事件的方式的缺点:
靠事件代码维持这种双向绑定的效果,实际上后台代码应该是处理工作逻辑,而不是进行这种控件事件的处理。
控件与控件的绑定
    <Grid>
        <StackPanel>
            <Slider x:Name="slider" Margin="5"/>
            <TextBox Text="{Binding ElementName=slider,Path=Value}"  Margin="5" Height="30"/>
            <TextBox Text="{Binding ElementName=slider,Path=Value}" Margin="5" Height="30"/>
            <TextBox Text="{Binding ElementName=slider,Path=Value}" Margin="5" Height="30"/>
        </StackPanel>
    </Grid>
此模式下就完成了双向绑定,有几个特点:
1。 注意此时后台不需要任何代码的,我们也删除了事件的方式,这种绑定完全是在xmal端完成的
2。 此时3个textbox不需要命名的。
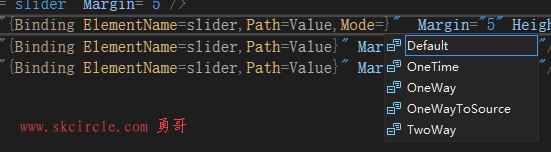
3。 你也可以指定绑定模式
Default 默认的双向绑定
OneTime 绑定变化只反映出第一个值的变化
OneWay 单方面模式,对于本例,只允许slider改变textbox,而反过来不允许
OneWayToSource 就是OneWay倒过来,只允许Textbox改变slider
TwoWay 双向绑定
控件与属性的绑定
指的是后台的某个类的属性做绑定关系。
    <Grid>
        <StackPanel>

            <TextBox Text="{Binding Name}"  Margin="5" Height="30"/>

        </StackPanel>
    </Grid>
注意DataContext这个是数据上下文。
有了它,上面xmal中的{Binding Name} 才真正有的意义。(没上下文就找不到数据源Name)
namespace WpfApp1
{
/// <summary>
/// MainWindow.xaml 的交互逻辑
/// </summary>
public partial class MainWindow : Window
{
public MainWindow()
{
InitializeComponent();
this.DataContext = new MyData()
{
Name = "张三"
};
}
}
public class MyData
{
public string Name { get; set; }
}
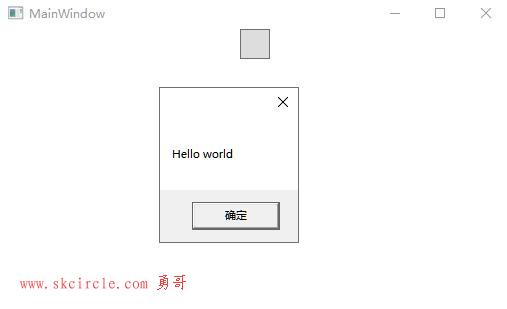
}控件的Command
对一个按钮来说,虽然可以有一个点击事件然后后台书写代码。
但是可以使用高级的Command机制做响应点击的动作。
注意两者各有应用场合,并不是谁替代谁。
xmal代码:
        <StackPanel>

            <Button Command="{Binding ShowCommand}" Height="30" Width="30"/>

        </StackPanel>
C#代码:
using System;
using System.Collections.Generic;
using System.Linq;
using System.Text;
using System.Threading.Tasks;
using System.Windows;
using System.Windows.Controls;
using System.Windows.Data;
using System.Windows.Documents;
using System.Windows.Input;
using System.Windows.Media;
using System.Windows.Media.Imaging;
using System.Windows.Navigation;
using System.Windows.Shapes;

namespace WpfApp1
{
    /// <summary>
    /// MainWindow.xaml 的交互逻辑
    /// </summary>
    public partial class MainWindow : Window
    {
        public MainWindow()
        {
            InitializeComponent();
            this.DataContext = new MainViewModel();
        }


    }

    public class MainViewModel
    {
        public MainViewModel()
        {
            ShowCommand = new MyCommand(Show);
        }

        public MyCommand ShowCommand { get; set; }

        public void Show()
        {
            MessageBox.Show("Hello world");
        }
    }

    public class MyCommand : ICommand
    {
        Action _act;
        public event EventHandler CanExecuteChanged;

        public MyCommand(Action act)
        {
            this._act = act;
        }

        public bool CanExecute(object parameter)
        {
            return true;
        }

        public void Execute(object parameter)
        {
            this._act.Invoke();
        }
    }

}
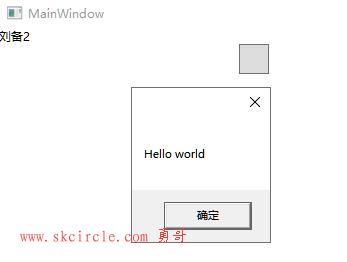
控件更新通知
解决在Command代码中,更新Name属性,无法更新到控件上的问题。
只要继承 INotifyPropertyChanged接口,使用它提供的PropertyChanged事件即可完成更新。

Xmal代码:
注意{Binding Name} 这个绑定实际上就是做了订阅通知事件。
    <Grid>
        <StackPanel>
            <TextBlock Text="{Binding Name}"/>
            <Button Command="{Binding ShowCommand}" Height="30" Width="30"/>

        </StackPanel>
    </Grid>
后台代码:
public class MainViewModel: INotifyPropertyChanged
    {
        public MainViewModel()
        {
            ShowCommand = new MyCommand(Show);
            name = "刘备";
        }
        private string name;
        public string Name
        {
            get { return name; }
            set
            {
                name = value;
                PropertyChanged.Invoke(this, new PropertyChangedEventArgs("Name"));
            }
        }
        public MyCommand ShowCommand { get; set; }

        public event PropertyChangedEventHandler PropertyChanged;

        public void Show()
        {
            Name = "刘备2";

            MessageBox.Show("Hello world");
        }
    }
优化代码,弄个基类,简化多属性情况下的使用麻烦问题。
几点说明:
1。 由基类NodifyBase做事件通知
2。 基类中的[CallerMemberName]特性,可以取得传入参数的值。这样我们就不用写传入值了。(写了也可以)
    public class MainViewModel: NodifyBase
    {
        public MainViewModel()
        {
            ShowCommand = new MyCommand(Show);
            name = "刘备";
        }
        private string name;
        public string Name
        {
            get { return name; }
            set
            {
                name = value;
                //PropertyChanged.Invoke(this, new PropertyChangedEventArgs("Name"));
                OnPropertyChange();
            }
        }

        private string title;
        public string Title
        {
            get { return title; }
            set
            {
                title = value;
                //PropertyChanged.Invoke(this, new PropertyChangedEventArgs("Title"));
                OnPropertyChange();
            }
        }

        public MyCommand ShowCommand { get; set; }

       // public event PropertyChangedEventHandler PropertyChanged;

        public void Show()
        {
            Name = "刘备2";

            MessageBox.Show("Hello world");
        }
    }


    public class NodifyBase : INotifyPropertyChanged
    {
        public event PropertyChangedEventHandler PropertyChanged;

        public void  OnPropertyChange([CallerMemberName]string propertyName="")
        {
            PropertyChanged.Invoke(this, new PropertyChangedEventArgs(propertyName));
        }
    }
MvvmLight框架
nuget安装 MvvmLight。
修改MainViewModel代码:
我们可以看到这个框架也实现上面Command和控件更新通知的效果。
   public class MainViewModel:ViewModelBase
    {
        public RelayCommand ShowCommand { get; }
        public MainViewModel()
        {
            ShowCommand = new RelayCommand(Show);
            name = "刘备";
            title = "windows";
        }
        private string name;
        public string Name
        {
            get { return name; }
            set
            {
                name = value;
                RaisePropertyChanged();
            }
        }

        private string title;
        public string Title
        {
            get { return title; }
            set
            {
                title = value;
                RaisePropertyChanged();
            }
        }

        public void Show()
        {
            Name = "刘备2";
            Title = "windows12";
            MessageBox.Show("Hello world");
        }
    }


")
")
常用的6种方法")
 封装运动功能")


Qt Widgets Designer界面设计器和界面应用")
:if的bool判断, 变量的作用域范围, 格式字符串, 弹窗, 列表推导式, 一个点歌小程序")